Building a Porch for Southern Living: Must-Have Features for Your Home
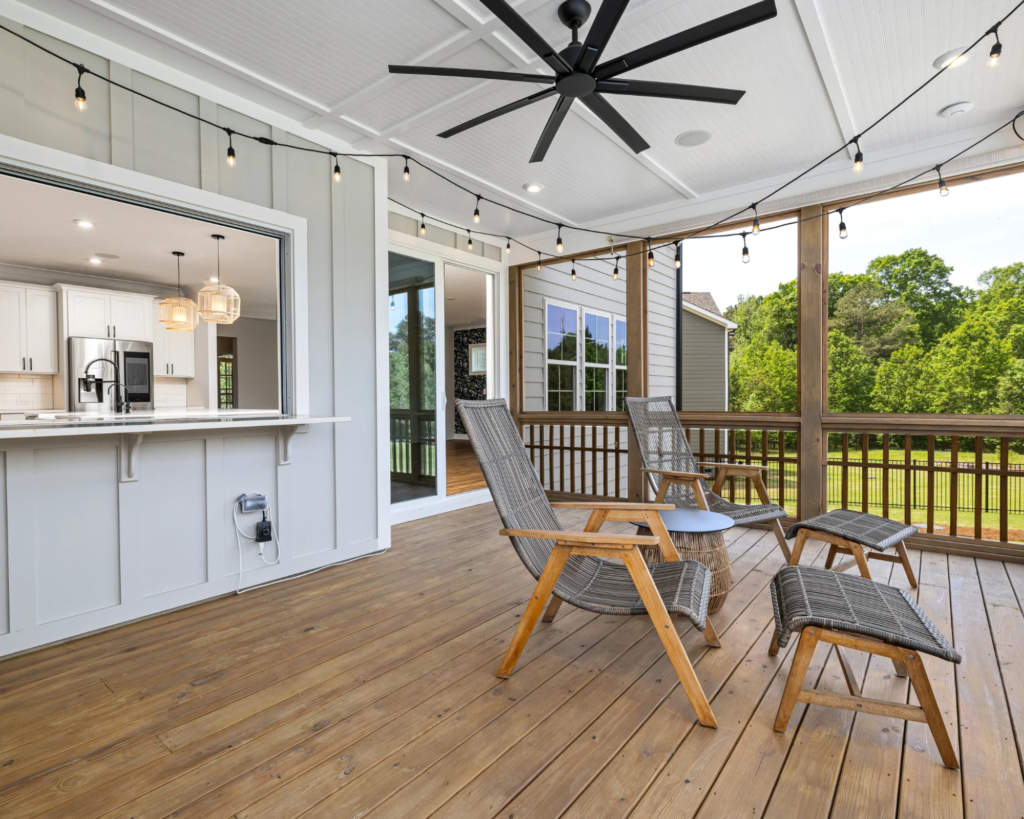
If you’ve ever visited Charleston, South Carolina, or spent time in the surrounding Lowcountry, you’ve likely noticed something that sets the tone for the region’s lifestyle: the porch. A porch isn’t just an addition to a house; it’s an essential part of Southern living. It’s where neighbors gather, where families relax after a long day, and where you get to enjoy Charleston’s signature breezes and views If you’re looking to build or renovate a porch that reflects the charm and warmth of Southern living, there are a few must-have features that will ensure your outdoor space is both functional and full of character. Here’s how you can design the perfect porch for your Charleston home. 1. Comfortable Seating for Relaxation and Socializing A Southern porch isn’t complete without cozy seating where you can unwind, entertain, or spend time with family and friends. The key to porch seating is comfort—after all, the porch is meant to be an inviting and relaxing retreat. Must-Have Features: Swing or Rocking Chairs: A porch swing or a couple of classic rocking chairs are essential for the Southern porch vibe. They evoke a sense of nostalgia and provide the perfect spot for enjoying Charleston’s warm evenings and cool breezes. Cushioned Furniture: Invest in comfortable, weather-resistant cushions for your seating. Think wicker chairs or a sectional sofa with soft pillows that invite you to lounge for hours. Plenty of Space: Make sure your seating area can accommodate multiple people. The porch is a place for gathering, so consider a larger arrangement with enough seating to host friends and family. 2. Classic Southern Style Flooring In Charleston, the aesthetic of the porch is just as important as its function. Flooring plays a significant role in setting the tone for your space. Traditional Southern homes often feature distinctive porch floors that are both beautiful and durable. Must-Have Features: Wooden Decking: For an authentic, timeless look, opt for wood decking—something like cypress, which is native to the region and resistant to moisture. Its warm tones and natural grain add rustic charm to your porch. Painted Floors: Many Southern homes feature painted porch floors in soft, pastel hues or traditional colors like deep green, blue, or gray. A painted floor is both charming and practical, protecting your wood from the elements while enhancing your porch’s character. Tile or Brick: For a more polished look, consider brick or tile flooring. These materials work well for more formal Southern homes and provide a hard, durable surface for high-traffic areas. 3. Ceiling Fans for Comfort and Style Given the warm climate of Charleston and the Lowcountry, no porch is complete without ceiling fans. They not only provide much-needed relief from the heat but also add an element of Southern style. Must-Have Features: Classic Ceiling Fans: Choose a ceiling fan with a traditional design, such as those with wooden blades or vintage metal finishes. Fans help keep the air circulating, making your porch a comfortable place even during summer’s hottest months. Multiple Fans for Large Porches: If you have a large porch or one that spans the length of your home, consider adding multiple ceiling fans to ensure even air circulation. 4. Thoughtful Lighting for Evening Ambiance One of the joys of Southern living is spending evenings outside, whether it’s for a family dinner, a quiet evening with a book, or casual gatherings with friends. The right lighting sets the mood and allows you to enjoy your porch well after the sun goes down. Must-Have Features: Hanging Lanterns or Pendant Lights: A Southern porch often features hanging lanterns or vintage-style pendant lights to add both light and character. These lights can be both functional and decorative, providing soft illumination without being overpowering. String Lights or Fairy Lights: For a charming, casual feel, string lights can create a magical atmosphere. Drape them across the ceiling or along the rails for a cozy, welcoming vibe. Wall Sconces: If you have porch walls or columns, wall sconces can be a great way to add ambient lighting and accent the architectural features of your home. 5. Ample Greenery and Landscaping Southern porches are not just about the structure; they’re about blending indoor and outdoor living. Adding greenery to your porch creates a welcoming, natural environment that enhances the beauty of your space and gives it that timeless Southern feel. Must-Have Features: Hanging Plants: Charleston homes are known for their lush greenery, and the porch is the perfect place to bring in that charm. Hang baskets of ferns, ivy, or flowering plants from the ceiling to add texture and color. Potted Plants: Place potted plants on the floor or along the railing for added beauty. Consider low-maintenance plants like geraniums, petunias, or even a few small citrus trees to bring vibrant color and fragrance to your porch. Climbing Vines: For a more romantic Southern look, consider planting climbing vines like wisteria or jasmine near the porch. These vines can grow up trellises, creating natural, leafy arches over the space. 6. Architectural Features with Southern Charm When building a porch for Southern living, it’s important to incorporate architectural elements that evoke a sense of charm and elegance. These features will not only enhance the look of your porch but will also help create the quintessential Southern aesthetic. Must-Have Features: Columned Railings: Columns are a hallmark of Southern homes and add a sense of grandeur to any porch. Whether they’re classic white columns or painted in a soft pastel, they’ll elevate your porch’s look and make it feel like a true Southern retreat. Gable Roof or Pergola: A gable roof or pergola is a popular architectural feature that provides shade and gives your porch a more open, airy feel. It’s also a great way to frame your porch and make it feel like an outdoor room. Lattice Work or Screened-In Porches: Lattice work along the bottom of your porch adds texture and can also prevent pets or small children from wandering off. Alternatively, consider a screened-in porch to keep bugs at
Building a Porch for Southern Living: Must-Have Features for Your Home Read More »